What I’ve Been Up To

Hi Everyone,

Notwithstanding my update for June’s astronomical events, I’ve been absent for the whole month of May. That is because it’s been a busy month for me. Here’s a bit of an update of what I’ve been up to from April 22 to now.

On April 22, 2015, I delivered my presentation about my experience as an amateur astronomer that day. Throughout the presentation, I talked about the photos I took, honestly, and with a little bit of humour. It was well received by the audience.  I hope to follow that up with another presentation a few years down the line.

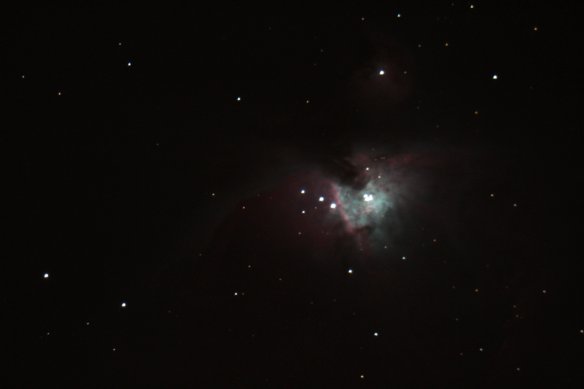
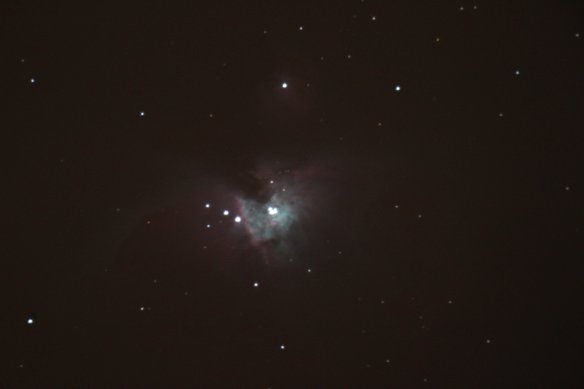
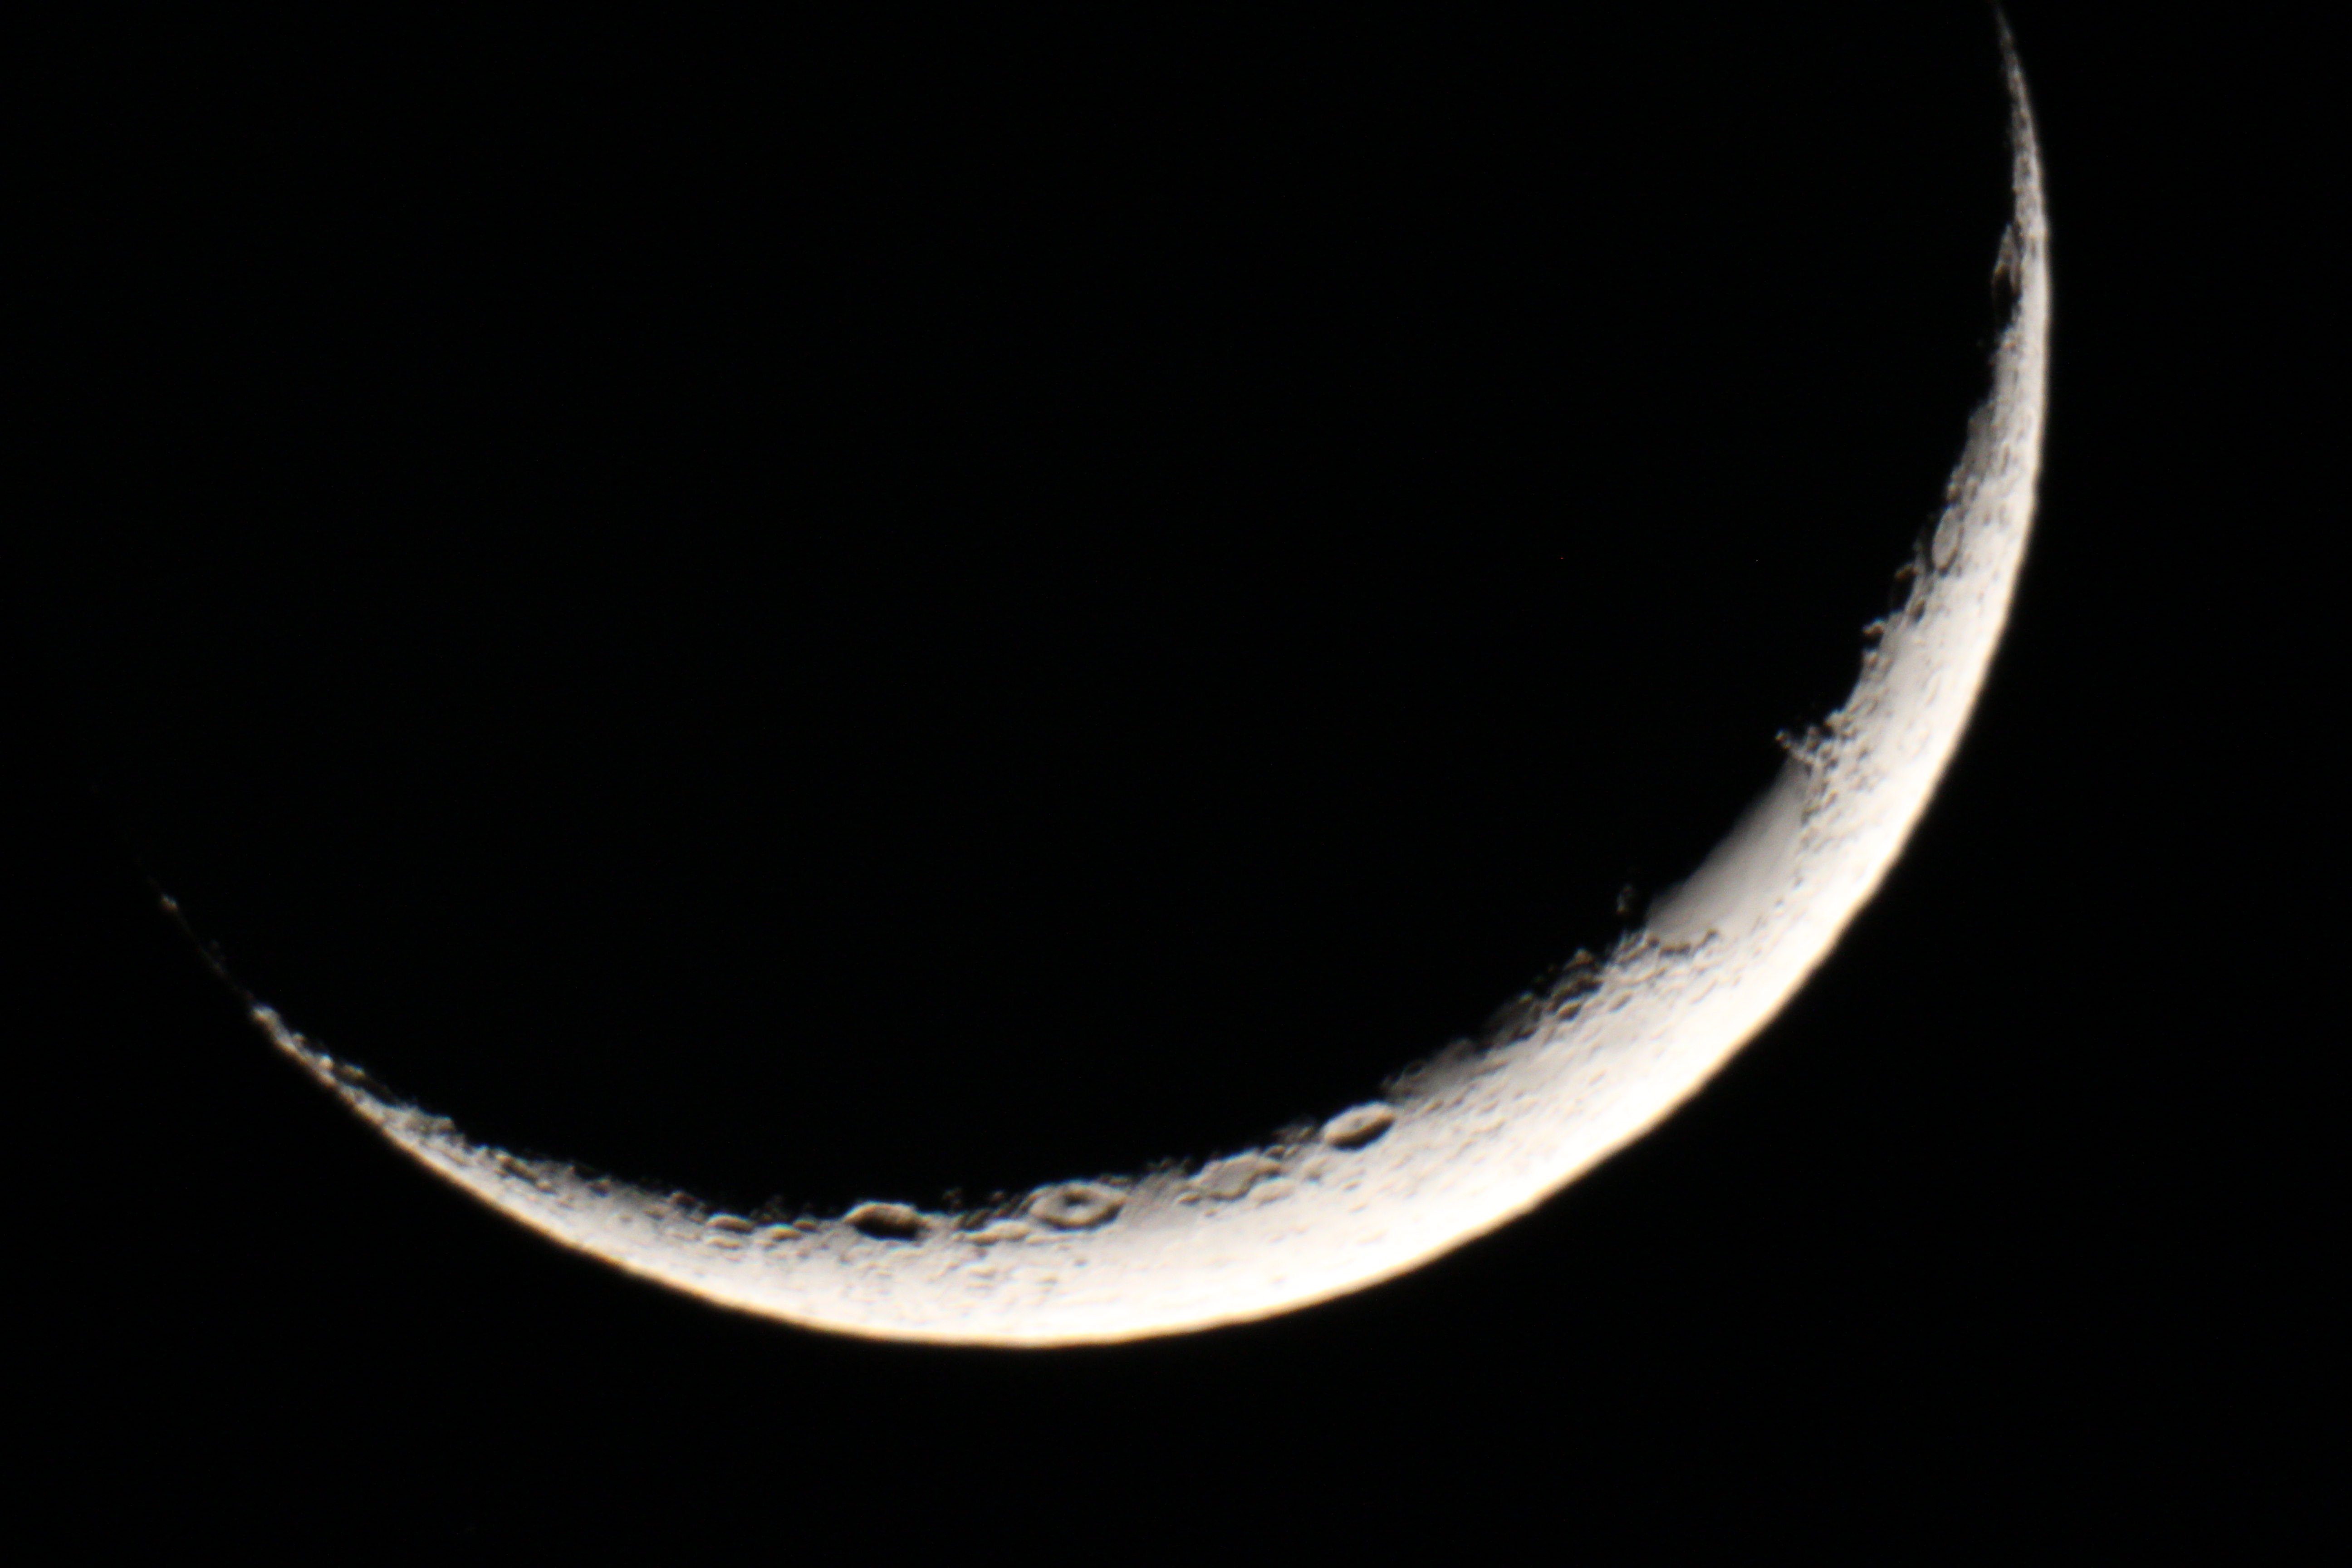
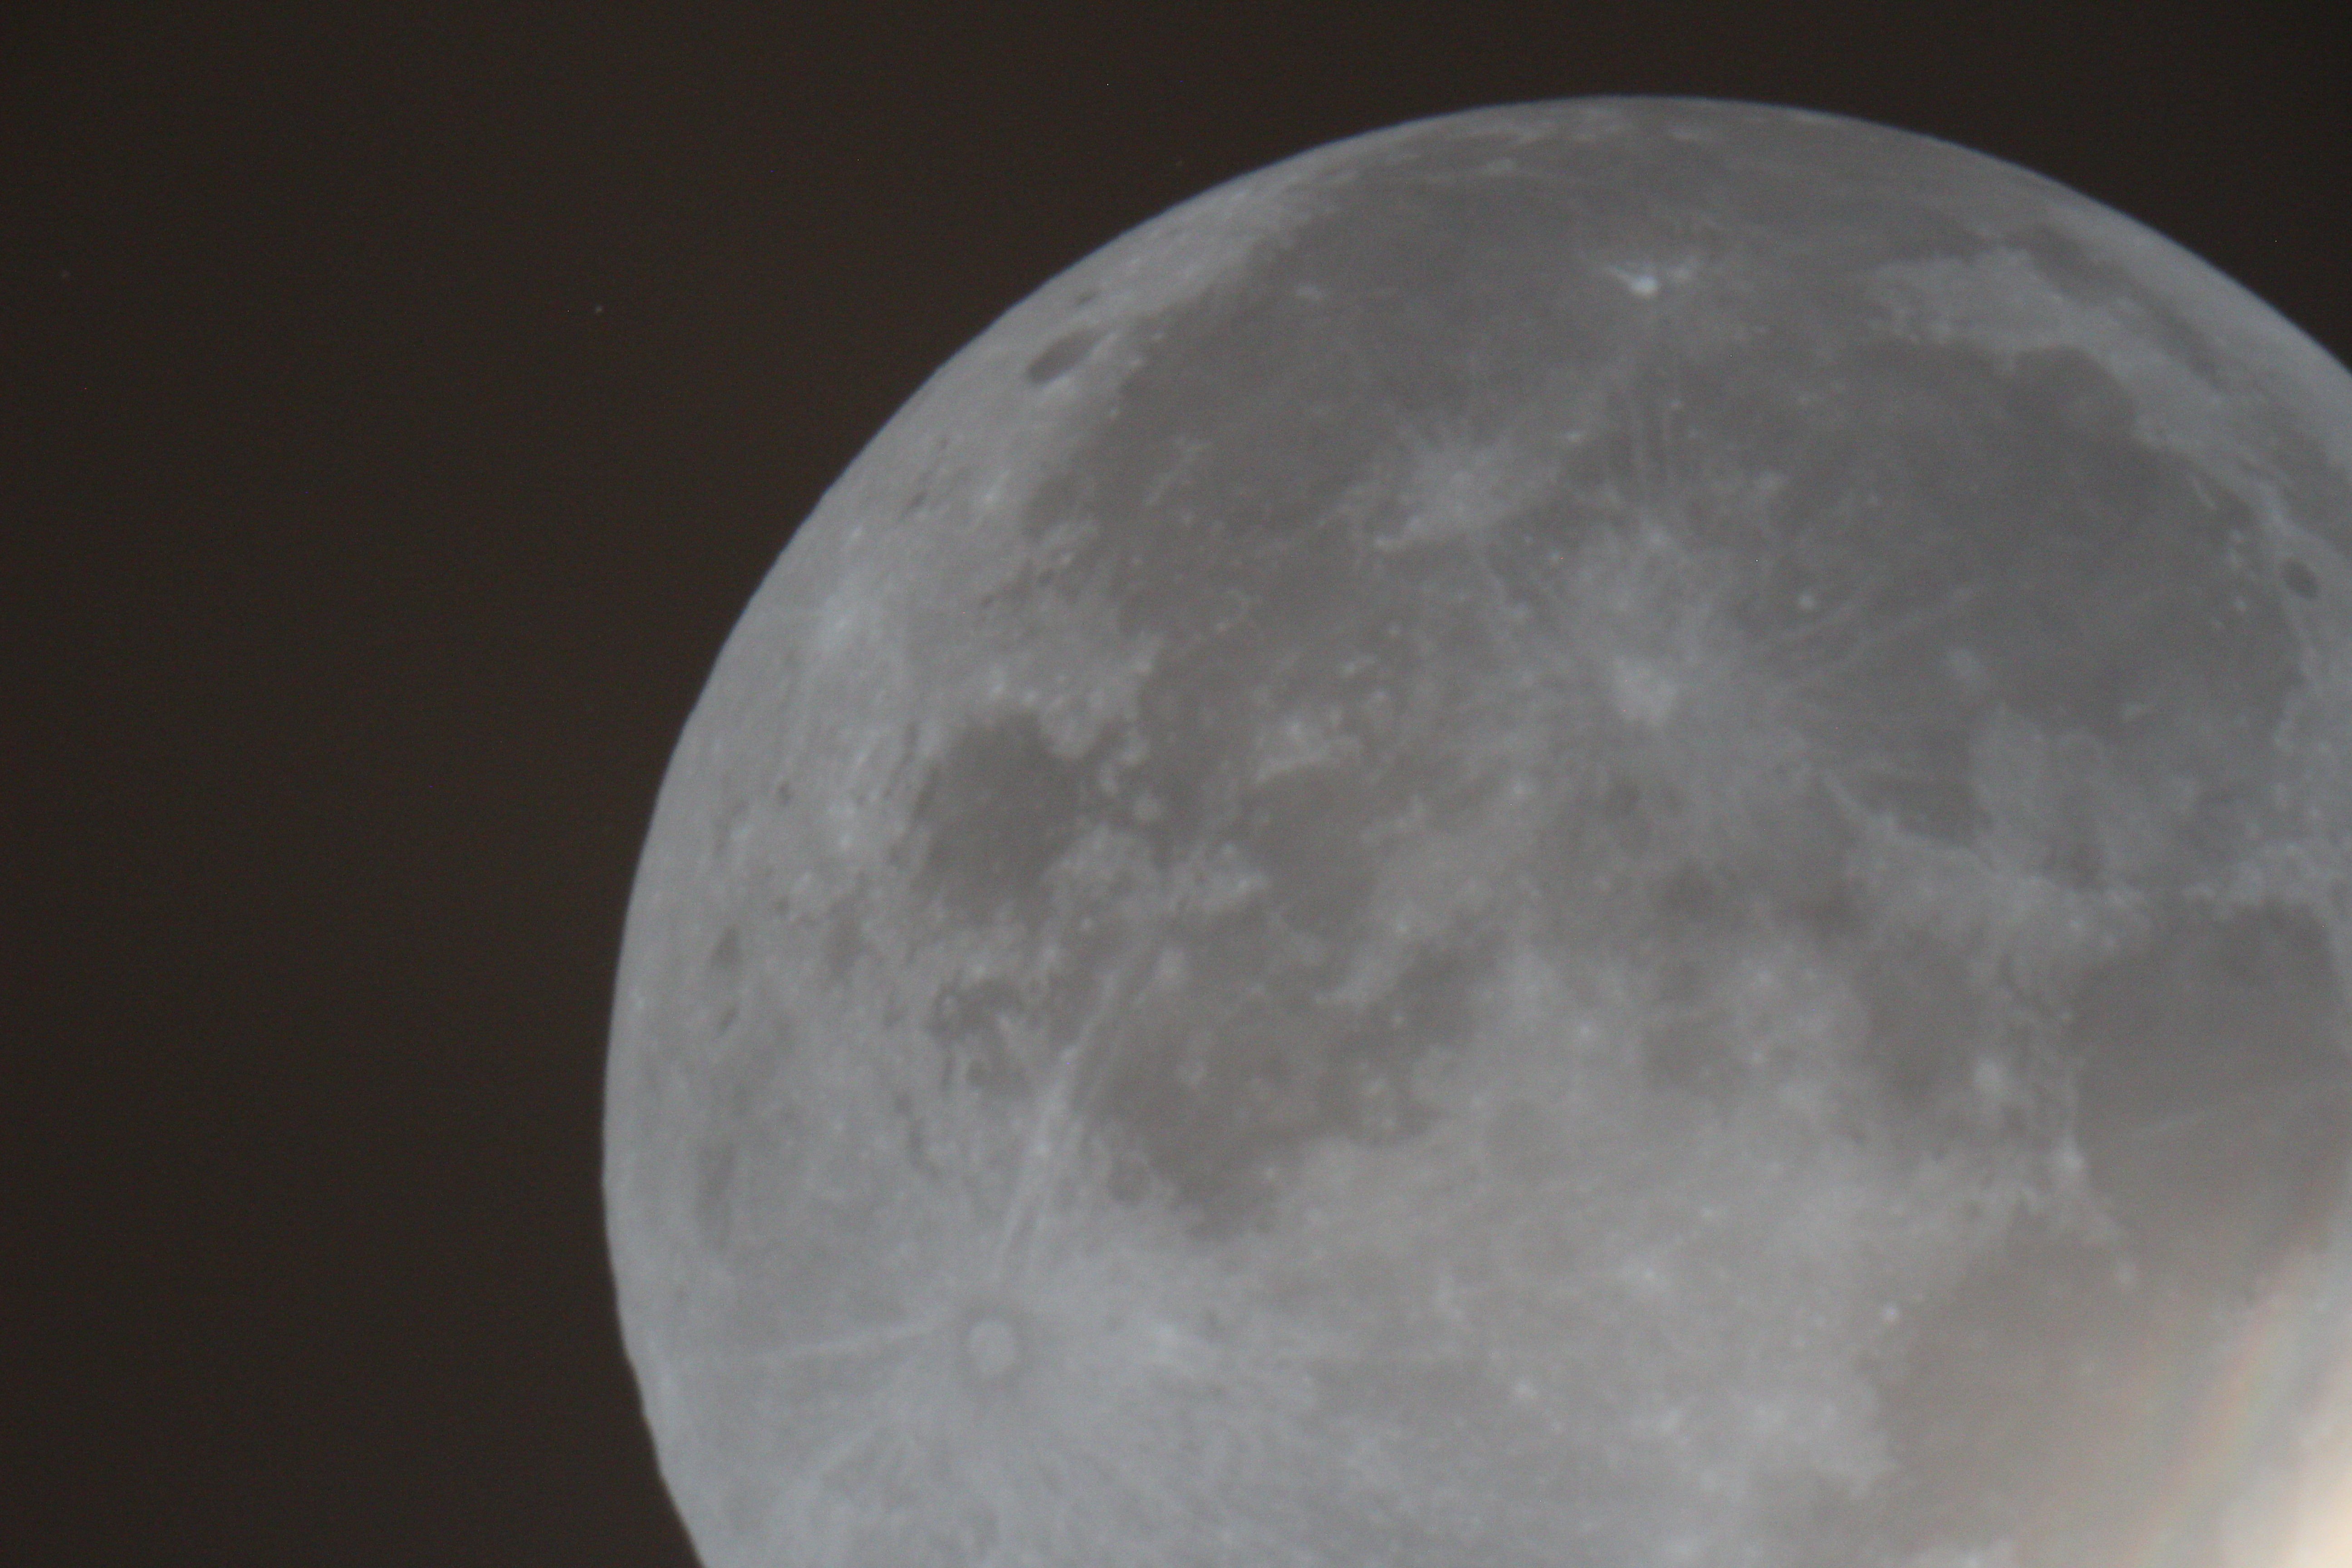
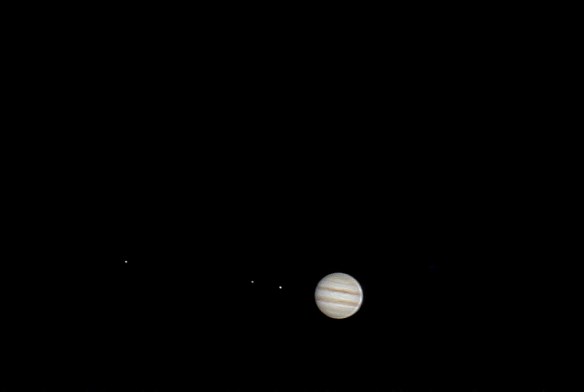
On April 28, 2015, I discovered the wonders of BackyardEOS. It’s a program that uses your DSLR camera like a CCD Camera. It was really effective as an imaging device, and as a focusing device. I got a few pictures like this using BackyardEOS.

Jupiter_EOS_Test_Tv1-30s_800iso_1024x688_20150428-21h23m00s_Stacked_EOS_Histo

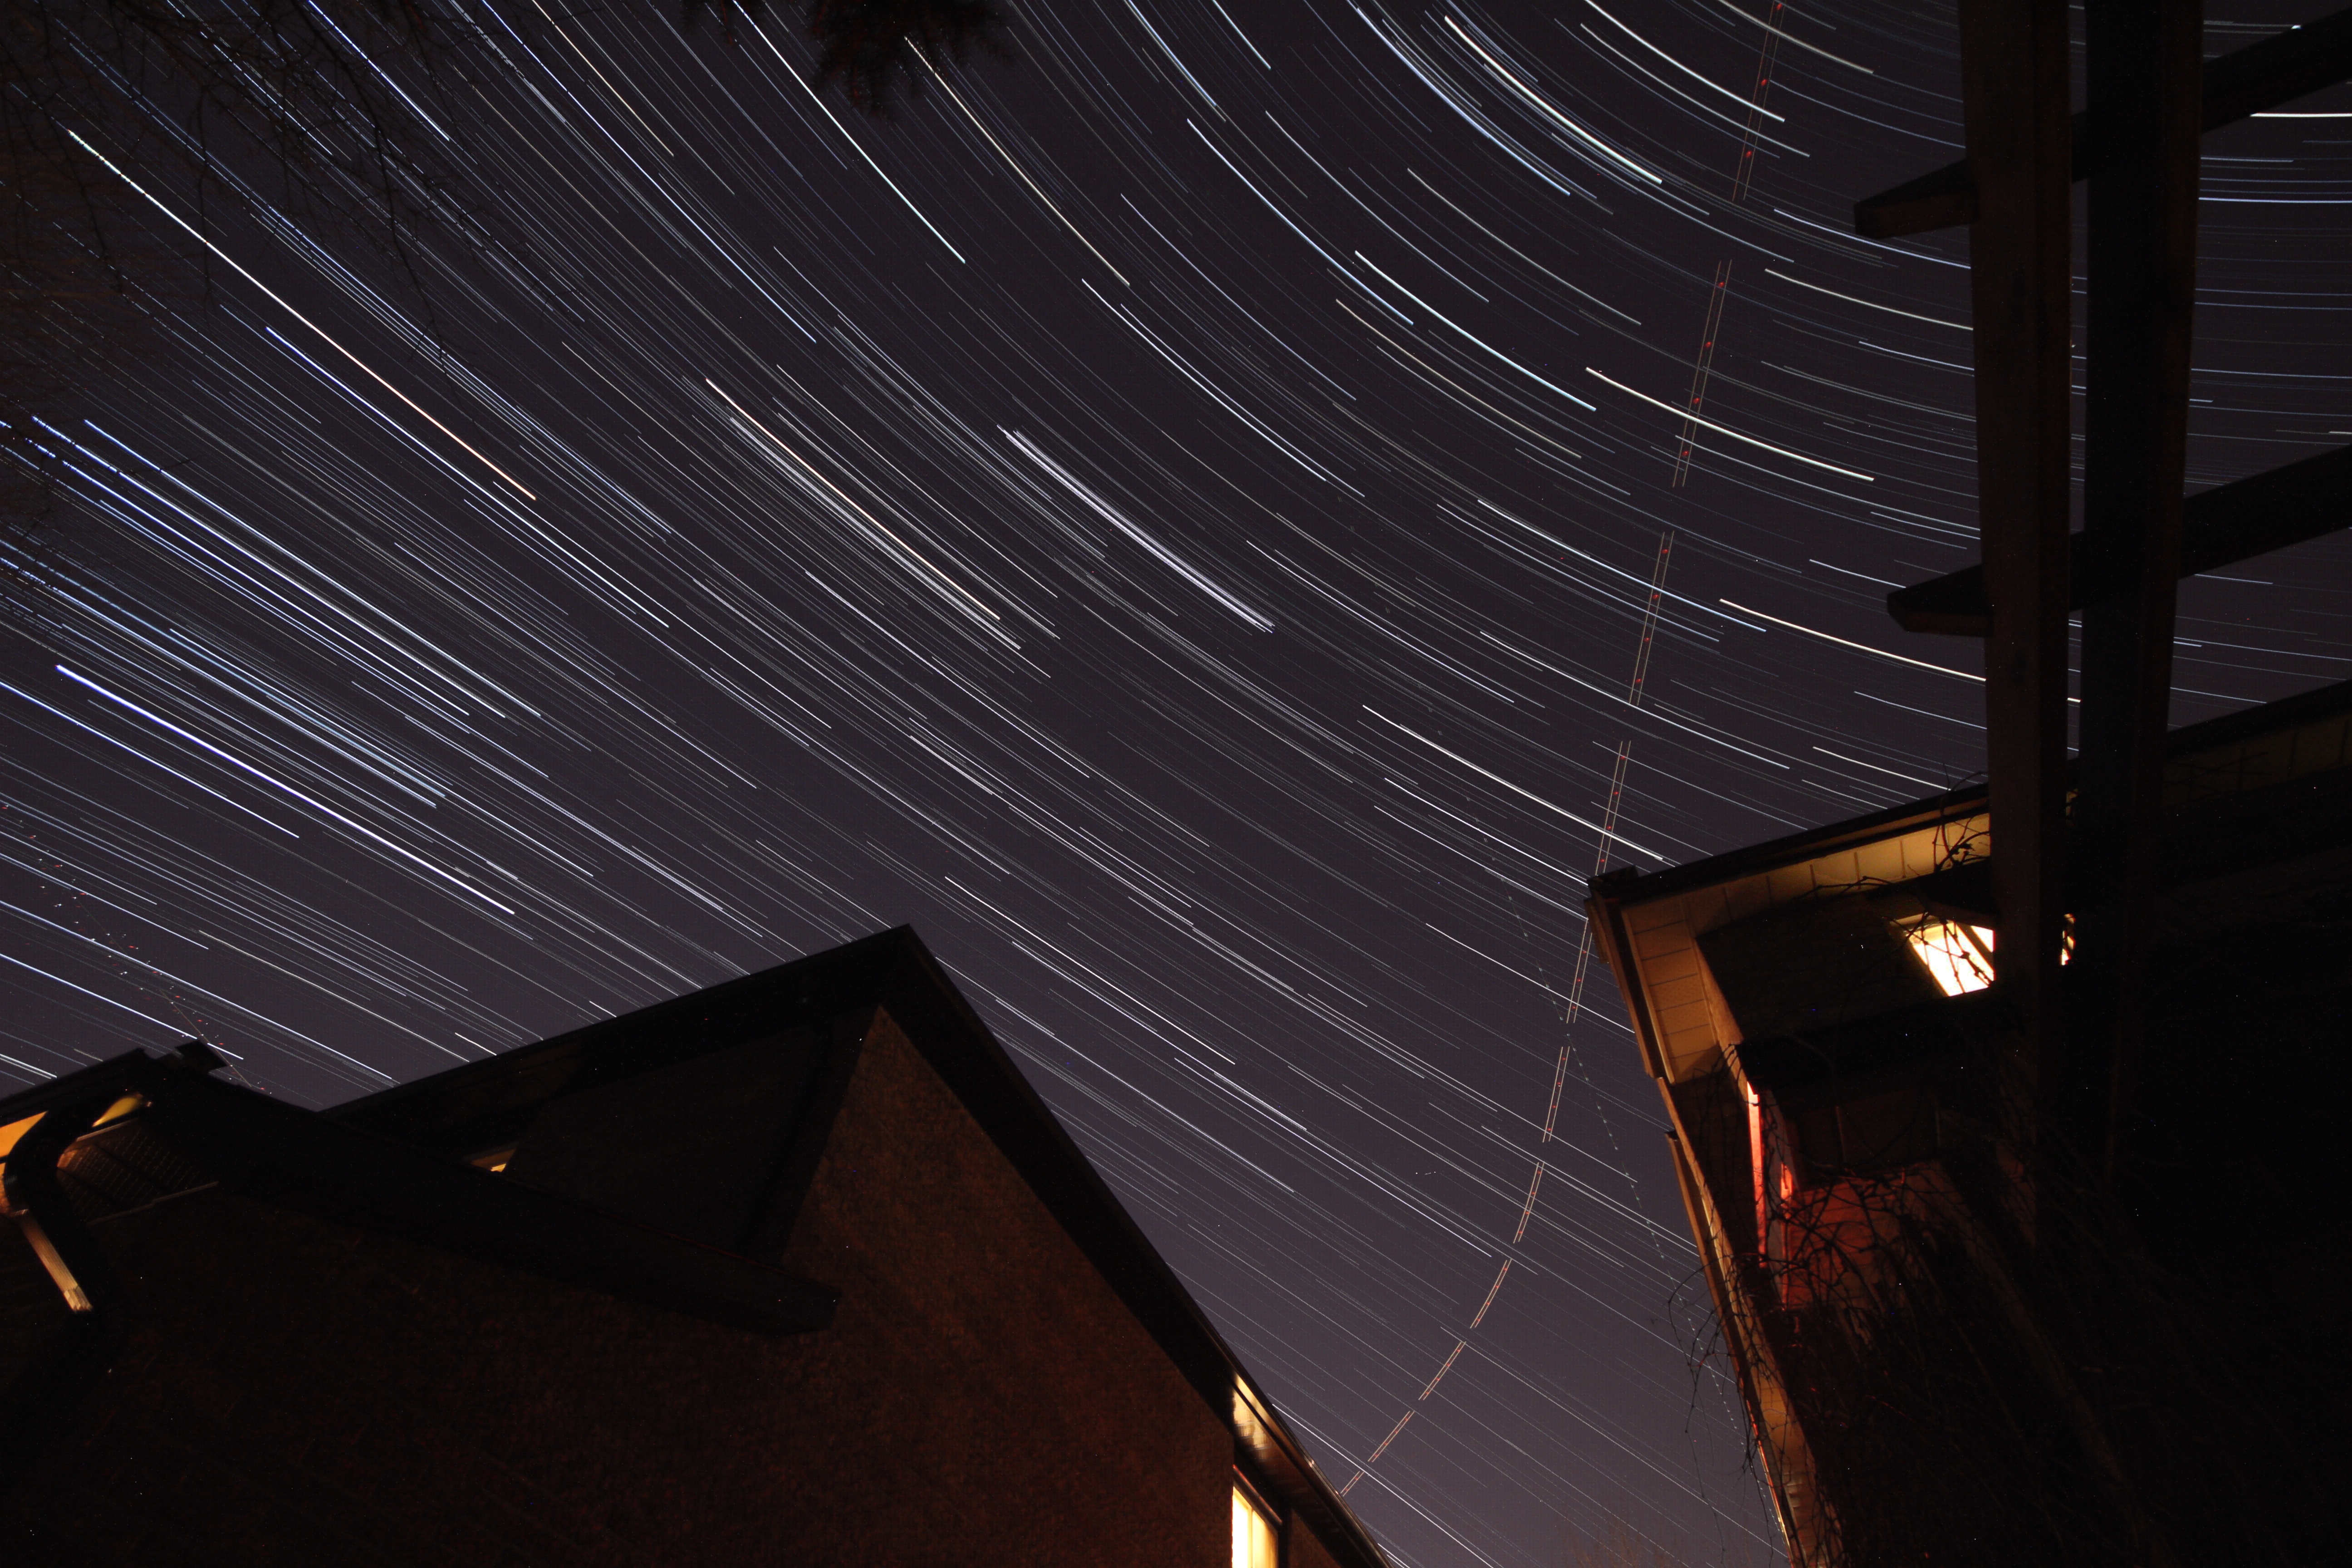
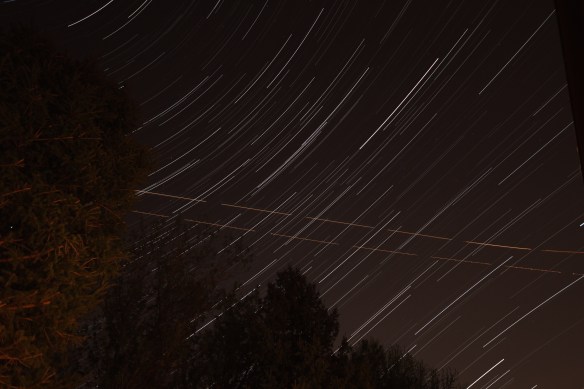
On May 8, 2015, It was a clear night, and I felt like taking another startrails image. Therefore, I made another startrails image from my backyard. I used over 700 frames, 5”, f/4.5, ISO-800. It turned out really well.

StarStaX_IMG_0587-IMG_1333_gap_filling

From May 20-24, 2015, I had the opportunity to volunteer for the International Space Development Conference (ISDC). It was a great experience as I made met many heavyweights in the aerospace industry, gained valuable experience, and made many new friends. I had a great time. In addition, I was able to get this startrails image from the heart of downtown Toronto. I took over 1043 frames to get this image. Each frame were 3” exposure, f/5.6, ISO-1600. It was a long image, but it was worth it. Next year’s ISDC will take place in Puerto Rico. Who knows, maybe I’ll be there…

StarStaX_IMG_8100-IMG_7059_gap_filling

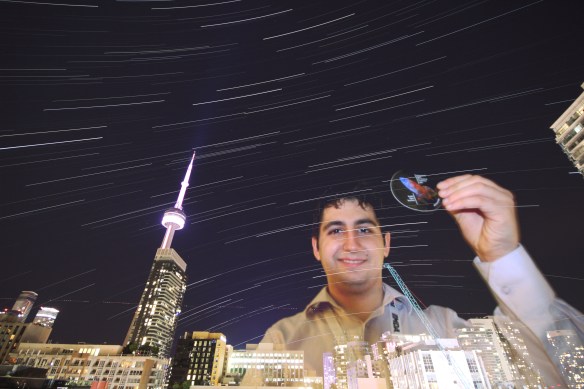
This image was a difficult one to capture. I needed to balance how much light I would capture, while still capturing the movement of the stars. Too much exposure captured the light pollution of the city. Too little and the stars won’t show up. That’s why I chose 3″ exposure, because it wouldn’t capture too much light, while still capture the stars. f/5.6 to reduce the amount of light pollution captured, and ISO-1600 because we need to capture enough light.


That is what I’ve been up to these days. Thank You for everyone’s support. Sorry for the sporadic blog posts. Keep looking up, you never know what you’ll find up there.

Advertisement

Imaging Orion’s Nebula: Long Sault

March 16-19 was RASC’s Dark Sky Party window. On March 17, RASC called a NO GO for the party due to the heavy winds. It was clear, but the winds were HEAVY! I was hoping that March 18 would have a GO call, because my schedule was well placed, and I could go to that event.


March 18, 5 pm:

I got RASC’s call, and it was a GO. The Star Party will take place that night. When I got home, I packed my car with all my telescope equipment, and drove off to Long Sault Conservation park (Long Sault).

Driving to Long Sault or Glen Major forest feels like a road trip. One passes through many small hamlets on the road to your destination, and you see how people live beyond Toronto. Homes are more open, commercial services are scarcer, and speed limits are higher. To drive to Long Sault takes 45 minutes to 1 hour, and I arrive at Long Sault at 9 pm.


March 18, 9 pm:

When I get there, a lot of interested astronomers, guests, and astrophotographers were already there imaging and observing the night sky. Looking up, the sky is very different from home, and from Glen Major Forest. The sky is clearer, and constellations are more visible from here.

I meet some of the other guests and members there. Some were observing Jupiter, others were imaging various Deep Sky Objects (DSO’s), and some were observing other objects in the night sky. Soon after, I start to assemble my telescope, which didn’t take a lot of time.

I aligned my telescope to two stars. Usually, my selection of stars is limited at home due to location, and visibility of stars. Out in Long Sault, the limitations of my selection of stars are what’s in the telescope’s computer. After aligning my telescope to the stars, I pointed my telescope to Orion’s Nebula, and I set my telescope to image M42 for 75 frames. Some frames that I took looked like this:

IMG_5434

1 frame of M42; 14․7″ exposure, f/10, ISO-1600


While my telescope was doing its work. I was meeting other fellow amateur astronomers. I did meet a fellow amateur astrophotographer I was corresponding with on the Yahoo e-mail list. I saw his set-up, equipment, and images. They were spectacular.

Once the camera was finished imaging M42, I put the telescope cover on, and started taking dark frames, so I could subtract the noise from the image.

My feet beccame very cold, and I had to get into my car many times to warm up. I couldn’t turn on the car, because the exhaust would interfere with my telescope. At 11 pm, most of the astronomers packed up and have started their journey home. At that time, I also started packing up my equipment. I finished what I wanted to do, and I was ready to go home. It took me 10 minutes to pack and to make sure I didn’t forget anything. When I was ready, I started driving home.

I got home at 1:30 am, taking a break between my driving to rest and think about what I imaged that night. Unfortunately, I have not been able to process all the images yet, as I am having trouble with the Deep Sky Stacker, and Registax.

Thank You everyone for reading. Let me know if you have any questions or comments. Keep looking up, you never know what you will find up there.

Imaging Orion’s Nebula: Three days of Clarity

During the month of March, I was able to take advantage of the clear skies in three different days to image Orion’s nebula.

The First Day

On March 11, 2015, I tried imaging Orion’s Nebula (M42) it was a good night. I was able to get a few shots of M42 before it went below my house. I hoped I could get more pictures of M42, but before I could, it went behind my house. I was out of luck.

I proceed to image Jupiter with my DSLR camera. I took a lot of frames, but the quality of those frames were very bad. I couldn’t stack them to get a good picture. 😦 Maybe things will turn out better next time.

IMG_4583 IMG_5160

The Second Day

On March 13, 2015, I tried to image M42 again. It was a clear night, and I took some more pictures. I set my camera to image M42 for a while. I got the pictures, but I realize that while it was taking the pictures, M42 set behind my house. The majority of my pictures were of my house in the dark. Sadly, I had to delete those pictures.

After the M42 failure, I started imaging Jupiter again, and I failed to get any good frames.

IMG_5308 IMG_5372

The Last Day

Stay tuned for my next post, where I will talk about the last day of my M42 imaging days… For Now.

Tracking Tricks that Work

On March 9th, my father and I brought the telescope out to test its tracking capabilities. We aligned it to two stars and pointed it at Jupiter. After applying some tricks, we checked back and saw that it had not moved from its position. My father was impressed by that, and we declared that “we are back on track.”

The reason why it worked is because, earlier, I read this forum post about tracking issues. It talked about how commercial grade telescopes are manufactured using spur gears rather than worm gears, which means the teeth of the gears have some space in between them. This can lead to significant drifting before the teeth mesh. The solution, according to the forum post is to slew the telescope to the right, and depending on its position, up or down (down is pre-meridian, up if post-meridian, adjust as necessary). I did that and it worked. =D

Jupiter stood straight in the center of the eyepiece, and it was beautiful. We tested it further by putting Jupiter near the edge of the eyepiece, and after a while, it didn’t move at all.

After all that testing, we decided to pack up the telescope. I didn’t take any pictures because the clouds were rolling in. It was a successful night, with tracking actually working. I’m thankful that it is actually working and I can say with certainty that I’m back in business! 😀

Planets Crossing Paths

I was at work when this event took place. Thankfully, I was able to take my break at a time where I could image the phenomenon.

My break began at 6:30 pm. The sun had already set and the sky had turned a dark blue. The air was a freezing -14 C, with  a slight breeze coming from the south. It was not intense, but could shake the camera. Streetlights illuminate the parking lot at my workplace. Thankfully, the streetlights won’t cause me any problems.

I started my car, and assembled the tri-pod. I quickly took my camera to the tripod, and set it to image the event, a conjunction of Venus, Mars, and a thin crescent moon.

I set my camera to image the conjunction at various exposures, keeping the aperture, and sensitivity constant. The exposure ranged from 2″ to 1/6″ exposures.

After 134 shots, at 6:55 pm, my break was nearing the end. Therefore, I packed up my camera, and went back inside at 7 pm. This brief, 30 minutes of imaging was a great success yielding a variety of images. Some were shaky, and slightly unfocused, but a few crisp images came through. Here they are:

IMG_4387

1/5″ exposure, f/5.6, ISO-800

IMG_4404

1/4″ exposure, f/5.6, ISO-800

IMG_4414

1″ exposure, f/5.6, ISO-800

IMG_4424

1/6″ exposure, f/5.6, ISO-800

Keep looking up, you never know what you will find.

Two Bright Planets

I finished work at 6 pm today. At that time, the sky was clear, the sun is already 6-12 degrees below the horizon and Venus and Jupiter were shining brightly. I look at both planets, located in opposite sides of the horizon, and they both appear so bright. I wondered why, and came up with an answer.

Venus is many times closer than Jupiter, but they look similar in brightness. The reason why is because Jupiter is bigger and we can see more of it. Jupiter’s mass and radius is 1.89E27 kg (317.8 Earth Masses), and 69,911 km, whereas Venus is only 4.867E24 (0.815 Earth Masses), and 6,052 km respectively. Clearly, Jupiter is the larger planet, but (at closest point) is 588 million km away. Venus is the smaller planet, but is only (at closest point) 38 million km away. This means that they look similar in brightness when compared to each other.

Here is another example:

The sun is 1.9891 × 1030 kg, and 695,500 km in mass and radius respectively. The Moon is 7.34767309 × 10²² kg large and 1,737.5 km in mass and radius respectively. The sun is (clearly) the larger of the two, but when you put them on top of each other, such as during a Solar Eclipse, they look very similar in size.

For both cases, their actual distances and diameters vary greatly, but their angular diameter is similar. The angular diameter is the diameter of an object from a certain frame of reference. For example, the Moon is 31.075 arcminutes across, and the sun is 32 arcminutes across. Very similar in angular size, but greatly varied across the cosmic distances.

The next time you see Venus and Jupiter in the sky or a solar eclipse, Look at how different they are, but how similar they look. It’s will surprise you.


Keep looking up. You never know what you will find up there.


WORKS CITED

Google Search

UniverseToday.com

Wikipedia

The North Celestial Pole…Visualized

On January 28, 2015, the sky was clear, and I took the time to image another startrails image. I aimed my camera at the sky towards Polaris, and I set my camera to image the night sky at 5″ exposure, f/5, ISO-1600. I had stacked over 516 frames to get this image.StarStaX_IMG_3040-IMG_3605_gap_filling
I was happy with this image. Sadly, that’s all I did that night as it was too cold, and I had work the next day. Until the next clear night:

Keep looking up! You never know what you will find up there.

Jupiter Troubles

On January 23, 2015, my father and I, with clouds flying over us, decided to go to Glen Major Forest to image the Jupiter Triple-Transit event. Sadly, it was completely overcast there, which disappointed us.

We soon drove back home, where we noticed that the clouds have started to thin, and Jupiter was visible through the clouds. Therefore, my father and I quickly assembled the telescope in the backyard, as well as my laptop to image Jupiter through my CCD Camera.

We were able to get a good video footage of the Jupiter Triple-transit event. Unfortunately, I have not been able to process them yet. The program, Registax, has been giving me runtime errors, which is preventing me from processing the video footage.

After we get the video, the clouds came in and ended our astronomy session. We packed up and got back inside.

It was a successful night. We got good video footage, but we have yet to process the images. I want to get the video processed soon, and I will contact the developers for help.

Keep Looking Up. You will never know what you will find out there.

You Can See The Dark Side from Here

On January 22, 2015, the sky was very clear, and I saw a beautiful, thin, crescent Moon. In contrast with the surrounding sky, you could also see an outline of the whole moon, despite the fact it is mostly unilluminated. I imaged it using my father’s Telephoto lens, and the images turned out really well.

IMG_2815

2 Day old Crescent Moon 1/400″ exposure, f/5.6, ISO 1600


IMG_2820

2 Day old Crescent Moon. Old Moon in New Moon’s Cradle. 1/3″ exposure, f/5.6, ISO 1600

The image was so good, I wanted to take my telescope out and image it using that. The results were very good:

IMG_2861

2 Day Old Crescent Moon 1/30″ exposure, f/10, ISO 1600

IMG_2838

Is this a Dim Moon???

IMG_2828

Nope! It’s a 2 Day old Moon. Old Moon in New Moon’s Cradle. 1.6″ exposure, f/10, ISO 1600

IMG_2852

4.3″ exposure, f/10, ISO 1600

The resulting images were a great improvement compared to my earlier images. It was a sight to see the Moon so thin like that. However, something else caught my eye. A red star close to the Moon. I slewed to it, and took a few images:

IMG_2875

A don’t know what the star is beside it, but the red star looks like Mars. 10.1″ exposure, f/10, ISO 1600

After some time, after asking my father for help identifying it, my father told me that it was Mars. I was surprised to see Mars at this time. It was so far from Earth, that you wouldn’t be able to see anything from it. Nevertheless, it was a good image.

Sadly, the clouds started rolling in, and the Moon and Mars became obscured by a thick cloud, which ended my astronomy session. All this was in preparation for January 23/24’s event when Jupiter will do a triple-transit, and two of it’s Moon’s shadows merge. I still need to process the photos, so stay tuned.

A light polluted timelapse.

On January 20, 2015, the sky was clear. RASC had a plan for a star party at Long Sault Conservation park, but I had to get up early the next morning. Therefore, I had to miss it. Thankfully, I did not let the night go to waste. I took my camera and my father’s wide-angle lens and set the intervalometer to make a timelapse image. I would later make it into a star trails image.

Since my home is in a light polluted area, I had to expose for a shorter amount of time to compensate for the amount of light there is. I set the exposure for 5 seconds, at f/4, and ISO 1600. I left it out there for two hours and obtained over 719 frames for my image. The resulting image turned out to be a major success. The lines were crisp and clear, there were a few satellites and airplanes, and a beautiful set of stars trailing along the houses.

StarStaX_IMG_2118-IMG_2810_gap_filling2

Startrails Image: 693 frames 5″ exposure, f/5, ISO 1600

That was the only thing I did that night unfortunately. Nevertheless, I will continue exploring and imaging the night sky.